
Beyond the Clouds
Setting up a basic AI Navigation for a Boss
In this tutorial, I will be going over how to set up a very basic AI navigation inside of unity, I am not gonna show anything to advance. For this tutorial I will be using the boss I made for the game Beyond The Clouds. This will be broken up into three separate sections which include: Setting up the Environment, Setting up the AI, and Movement Programming.
Random Movement:
So with our boss we want to install a package inside of unity named AI Navigation, the main reason we want to add this is so the boss wont get stuck on anything in the environment. To install this package you will click on [Window > Package Manager > then click on the first tab unity registry] once you are in there click on the search bar on the top left, and type in AI Navigation and click install. For a visual of where to go please watch this video down below. (Note, after editing the video I realized I never clicked on the package itself, but when you type in AI Navigation it should pop up, just click the tab and then install)
Setting up the environment:
After we have the package installed it is now time to set everything up! First we will start with Setting up the environment. To do this, we will now click on the plus sign under the hierarchy > 3D Objects > then a cube, after a cube is added into the scene make the x and z axis as big as you want them to be. (Note try to keep the cube or what ever your first environmental game object at the coordinates of 0,0,0). Before we move onto the next area we have to set up one last thing with the cube; now we need to add a Nav Mesh Surface to it. To do that we will click on the cube in the hierarchy and now look at the inspector, and go to the bottom of the inspector where it says add component. Once you click on add component a search bar will appear in that search bar type in Nav Mesh Surface, and add it to the cube. Once it is added to the cube, we just need to do one more thing and that is to navigate to the Nav Mesh Surface in the cubes inspector, and click bake. Once completed it should look something like this (minus the walls and the other extra stuff, since I am using a half made game as an example)

Setting up the AI:
Now we have to start making the Ai to do this we will repeat the steps of adding in a cube, but instead of adding in a cube we will add in a capsule. Now take the capsule and Rename it to what ever you want, for me, I like to keep it simple so I normally would name it something like Boss since I was setting up the movement for a boss. Now we will have to go to the capsules inspector, and go to the bottom and add in a Nav Mesh Agent, its the same thing we did when adding in the Nav Mesh Surface, but instead of typing in Nav Mesh Surface type in Nav Mesh Agent. Now that the capsule has a Nav Mesh Agent on it, move it to slightly above the blue visual that appeared when you baked the Nav Mesh. Once that is done we can now add a script to the Capsule. For an easy way of adding a script go into the capsules Inspector > Add Component, and when the search bar appears type in what ever you want to make your script, again Id try to keep it simple, so if this is the only boss in the game name it "BossAI" but you can name it to what ever you want it to be. After the script is made we will now enter it. Once in the script the first thing we will do is start coding the movement. After all is added it should look something like this minus the Particles (which don't mind my two spelling errors, I noticed it last second.) and the lines, again I am using a boss I made as an example.

Movement programming:
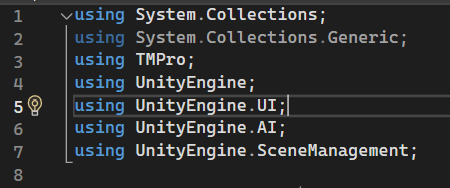
The first thing we need to do in the code is add the lines "using UnityEngine.AI;" at the top of the script along side the other using unity lines if it is not already there. This will allow the object to interact with the Nav Mesh Surface we added to the scene on top of that it will also allow us to tell the AI what we want it to do, within the Nav mesh surface. It should look something like this, minus the extra lines:
After that is added we will now move onto adding the variables we need all underneath the class. These Variables we need are health, distance, a shoot index. We will return to these later on in the tutorial. (Note for each of these variables you can name it to what ever you want, but again id try to keep it simple and this time straight to the point.)

The most important ones for movement are the ones named AI States and NavMeshAgent. So we will start with adding in a enmum AIState {move, attack] (Note you can add more inside the squiggly brackets, but I'm going to keep this simple since my AI is only gonna move and attack. ) These will be our AIs states in this case it will only move and attack.
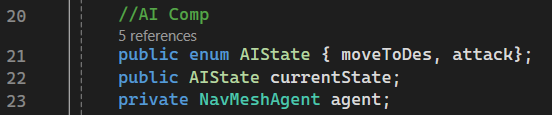
Now inside the Start Method which should be underneath all these variables we will be doing two things, one is accessing the NavMeshAgent, by adding the line "agent = GetComponent<NavMeshAgent>();" all this does is it grabs the Nav Mesh Agent from the capsule. (Note if you named your NavMeshAgent differently you would need to replace the agent part of my code with what ever you named it.)

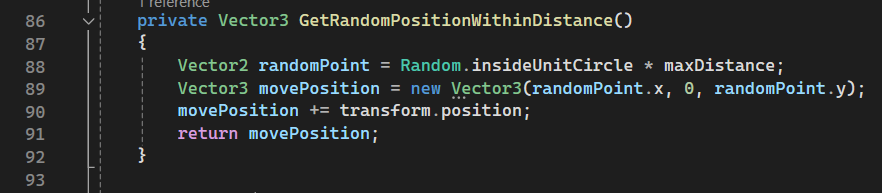
After you have that single line inside of the Start method we will create a new method more specifically a private Vector 3 named anything you want, I named mine "GetRandomPositionWithinDistance" because this method will find a random position within the distance that we set up top. Once the method is made we will get a random point within a radius, to do that we will type "Vector2 randomPoint = Random.insideUnitCircle * max distance" so what this is doing is it is finding a random point within a radius around the AI and it times it by the max distance, other wise the movement point change wouldn't be noticeable. The next thing we will do is tell the AI where they will need to move, to do that we will type "Vector3 movePosition = new Vector3(randomPoint.x, 0, randomPoint.y);" what this is doing is it is using the random point that we generated before and it is setting the move position to that point. To last things we need to do is add the lines "movePosition += transform.position;" and also "return movePosition;". What the first line does is it is adding the move position to the game object (boss/capsules) transform based on where it is located currently, so if the boss was at 0,0 it might now be at 0,20 since that is my max distance. All the return is doing is allowing the rest of the script access that variable we made. After all is done it should look something like this:
Now That we have the random position down we can now tell the AI to move to that position, to do this we will create a method named Handle States. Inside of the method we will add a switch case, that will switch between the current states. To do that type "switch(currentState){ }" all of the code we will make will go inside these squiggly brackets. Inside the brackets we will make type cases for our switch statement, with each case being called what ever you named the AI states, so I named mine moveToDes and attack. So the code inside the switch will be "case AIState.moveToDes:" with "break;" under this case with a single indent space. now in between the case and break we will tell the AI to move. In my code since I was making a boss I also made it so it cant attack and move at the same time, but for this tutorial I am gonna allow it to skip over the Attack since this is purely for movement. Inside the case we will type "Vector3 movePosition = GetRandomPositionWithinDistance();" what this is doing is every time this case is activated it will call the method we made before to get a random position to move to. Next we will add the line "agent.SetDestination(movePosition);" what this is doing is telling the Nav Mesh Agent to move to what ever position was generated. Now we will add in three lines of code that being "default: Debug.LogError("UnknownState:); break;" the entire code should look something like this, and dont mind the extra code, I was using the boss script. Although this is a slight glimpse into another devlog post that the other Programmer of our group (Harris) will be making.

The last step we need to do is call the handle states method in update the code for that should look something like this minus the if statement, just the code inside of it:
Although that was a lot to go through hopefully your AI will move to locations something like this, minus the AI shooting:
Leave a comment
Log in with itch.io to leave a comment.